3. Item
Bank
An Item Bank is a repository for tagging, organizing and categorizing
questions. All questions in the SMART
system must be first entered in the Item Bank.
The Item Bank module (see Figure 3.1) is assessed by clicking on the
Item Bank icon in the main SMART module.
The Item Banks (according to subjects) are shown on the left of Figure
3.1 and the questions in the Item Banks are displayed on the right. To group and sort questions for viewing, simply
drag the question headers to the top as shown in Figure 3.2.
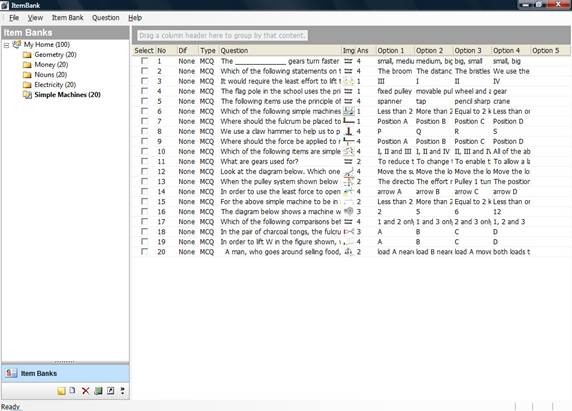
Figure 3.1: Main Item Bank Module
3.1 Item Bank Functions
Users can create, edit, delete, reorganize, import and export Item
Banks. The Item Bank supports a hierarchical
structure and questions can be organized according to Level, Subjects, Topics
and Sub-Topics etc.
3.1.1 Creating New Item Banks
a. Select the Parent Item Bank (on the left) to
insert the new bank
b. In the Item Bank Menu at the top, select “New …”.
Alternatively, click on the New Bank icon ![]()
c. Enter the name and description of the new Item
Bank in the dialog box (Figure 3.3)
d. Click on the “Create New Bank” button
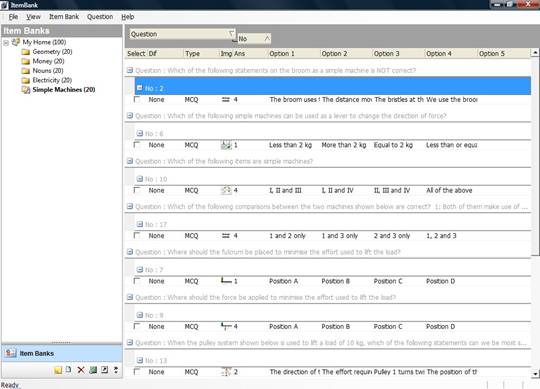
Figure 3.2: Grouping and Sorting
of Questions
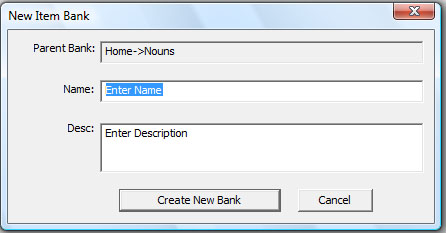
Figure 3.3: Creating a New Item
Bank
3.1.2 Editing Item
Banks
a. Select the Item Bank to be edited
b. In the Item Bank Menu at the top, select “Edit
…”. Alternatively, click on the Edit bank icon ![]()
c. Enter the new details of the Item Bank in the
dialog box (Figure 3.4)
d. Click on the “Update Bank” button
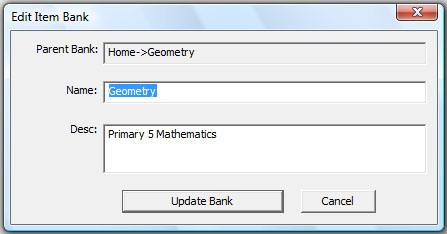
Figure 3.4: Editing an Item Bank
3.1.3 Deleting Item
Banks
a. Select the Item Bank to be deleted
b. In the Item Bank Menu at the top, select “Delete”.
Alternatively, click on the Delete bank icon ![]()
c. A dialog confirming the deletion appears (Figure
3.5)
d. Click on the “Yes” button. Note that the Item Bank and all its Sub-Banks
are deleted

Figure 3.5: Deleting an Item Bank
3.1.4 Moving Item Banks
a. Select the Item Bank to be moved with the left
mouse click. Do not release mouse
b. Move Item Bank to its new position and release
the left mouse click
c. The Item Bank and its Sub-Banks will be
automatically moved
3.1.5 Importing Item
Banks
a. Select the Parent Item Bank to import
b. In the Item Bank Menu at the top, select “Import
…”. Alternatively, click on the Import bank icon
![]()
c. A dialog (Figure 3.6) appears. Click on the “Browse …” button to select the
file
d. Click on the “OK” button. Note that the Item Bank and all its Sub-Banks
are imported
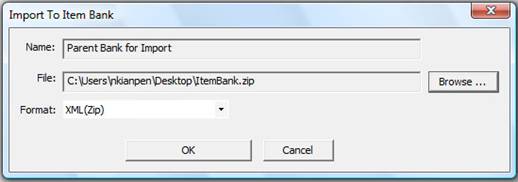
Figure 3.6: Importing an Item Bank
3.1.6 Exporting Item
Bank
a. Select the Item Bank to be exported
b. In the Item Bank Menu at the top, select “Export
…”. Alternatively, click on the Export bank icon
![]()
c. A dialog (Figure 3.7) appears. Click on the “Browse …” button to select the
output file
d. Click on the “OK” button. Note that the Item Bank and all its Sub-Banks
are exported
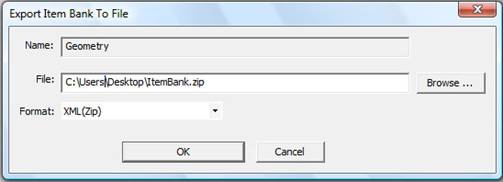
Figure 3.7: Exporting an Item Bank
3.2 Questions in Item Banks
Users can create, edit and delete questions in the Item Banks. There are three types of questions: MCQ (Multiple Choice - see Figure 3.8), MR (Multiple
Response – see Figure 3.9) and FIB (Fill in the Blanks – see Figure 3.10). For each question, a worked solution can be
entered.
3.2.1 Creating a New
Question
a. Select the Item Bank to place new question
b. In the Question Menu at the top, select “New …”
c. A dialog (Figure 3.8) appears. Enter the question, question type (MCQ, MR
and FIB) and difficulty
level if applicable
d. Click on the “Instructions …” button and a
dialog box appears. Enter the
instructions and click on
the “OK”
button
e. Import image if needed. Note that images can be imported from an
image file using the “Image
From File
…” button or paste from the Clipboard using the “Paste Image from Clipboard”
button.
Check on
the “Diagram before question” box if the image is to be displayed before the
question’s
text. By default, the image is
placed after the question.
f. Enter the number of Options. Currently a maximum of five options are
supported for MCQ and
MR. For
FIB questions, users can specify the number of blank lines to be printed
g. Click on the “Create and Exit” button
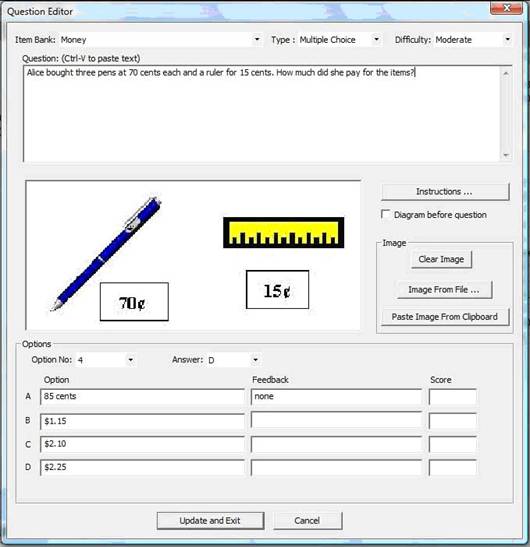
Figure 3.8: Multiple Choice
Questions
3.2.2 Editing Questions
a. Select the Item Bank and the question to be
edited by clicking the Select column beside the
question. Note that only one question can be edited at
any one time
b. In the Question Menu at the top, select “Edit …”.
Alternatively, double click on the question to enter the editing module
c. A question editor dialog (Figure 3.8)
appears.
d. Click on the “Update and Exit” button
3.2.3 Copying and
Moving Questions
a. Select
the Item Bank and the question to be copied or moved by clicking the Select
column beside
the question.
To select all questions, click on the menu Question->Select All. Conversely,
use Question->UnSelect All to
remove all selection
b. In the Question Menu at the top, select “Copy or
Move …”
c. A dialog (Figure 3.11) is displayed. Select the
destination directory of the questions from the tree
list
d. Select “Copy” or “Move” radical button
e. Click on the “OK” button
3.2.4 Deleting
Questions
a. Select
the Item Bank and the question to be deleted by clicking the Select column
beside the
question. To delete all questions
in the Bank, click on the menu Question->Select All. Conversely,
use Question->UnSelect All to remove
all selection
b. In the Question Menu at the top, select “Delete”
c. A dialog confirming the deletion is displayed
d. Click the “Yes” button
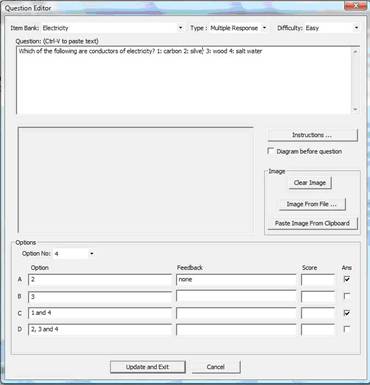
Figure 3.9: Multiple Response
Question
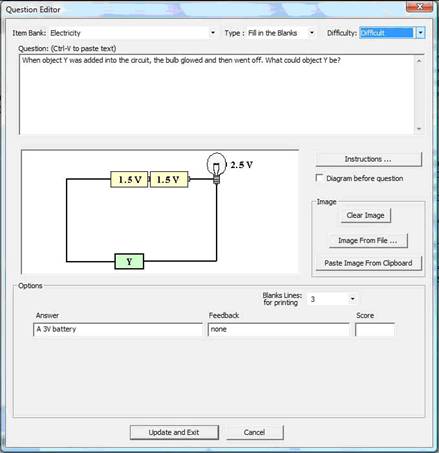
Figure 3.10: Fill In the Blanks
Question
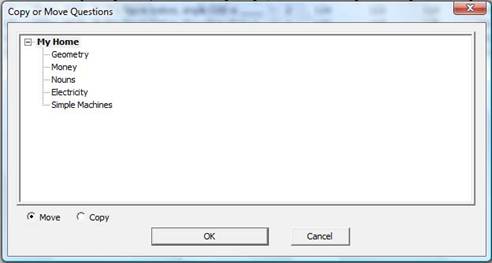
Figure 3.11: Copy or Move Question
in Item Bank