5. Accessing Embedded Content
The Content Access Control (CAC) module in PhotoViz embeds user content into images and can restricted access to the encrypted content using passwords and registration photos. The CAC embeds two types of data: a text message (or Photo Message) and file attachment (or Content). The following content can be embedded into images:
a. Documents and files. Any single document regardless of the file format and file extension e.g. Microsoft Office documents, PDF files, image files etc. For multiple files, it must first be zipped into a single file
b. URL. If an Internet is available, the URL will automatically be launched using the Internet Explorer (IE) browser
c. Web-based content. The web content (e.g. a product website) must be zipped into a single file. An index file to the web content is then specified. PhotoViz will launched the web content using the index file in the IE browser
d. Windows Applications. Any Win 32 application (*.exe) can be embedded. The difference between this content and the documents is that the application will automatically be executed by PhotoViz.
The CAC module in PhotoViz has a 30-day trial and a licence must be purchased at www.picsalive.com after the trial period. If users do not purchase a licence after the trial period, a free online encryptor is available in the Mail ++ portal (www.mailplusplus.com).
5.1 Registration Photos
Registration Photos are special images that must first be viewed before users can access content in subsequent images. Photo Messages and Photo Contents can be personalized so that only selected recipients will be able to access the messages or contents encrypted in the image. Personalization of Photo Messages and Contents creates a “personal” community or a social network structure where members can exchange photos, share feelings, notes securely.
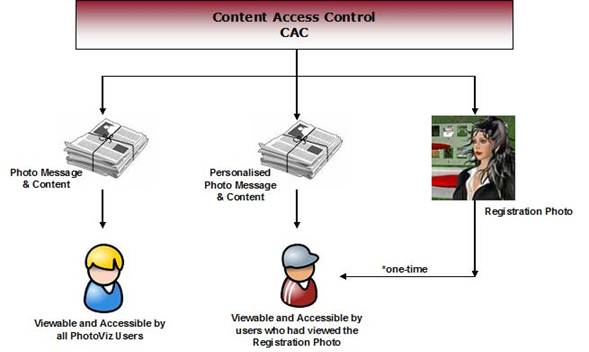
Figure 5.1: Registration and Personalization of Photo Messages and Photo Contents
Figure 5.1 shows an overview of the registration and personalization process. If a user wants to create a secure community with a selected audience, the user must first send a Registration Photo to all members in the group. When members of the group view the Registration Photo in PhotoViz, they are automatically registered and will be able to read all future Photo Messages or Contents from that member i.e. one-time registration. If Photo Messages or Contents are not personalized, all users of PhotoViz will be able to access and read the contents.
5.2 Message and Content Encryption
Users can embed message, content, create Registration Photo and password-protect their data in the CAC module.
Encryption
a. Select a photo in the main PhotoViz user interface
b.
Click on the ![]() icon to launch the CAC module (Figure 5.2)
icon to launch the CAC module (Figure 5.2)
c. Select a new output image filename if necessary. By default, “_en” is appended to the filename
d. Enter your text message in the Hidden Message box
e. Enter a password to protect the content if needed
f. Select the content type by checking the appropriate checkbox
g. Upload file using the “Browse …” button. For Zip files, an index file must be specified
h. To create a Registration Photo, check on the Personalized Message checkbox and the
Registration Photo checkbox. Enter UserID to identify the group or person. All subsequent
images to the
same group or person, the Enable Registration checkbox need not be checked
i. Click on the “Encrypt” button
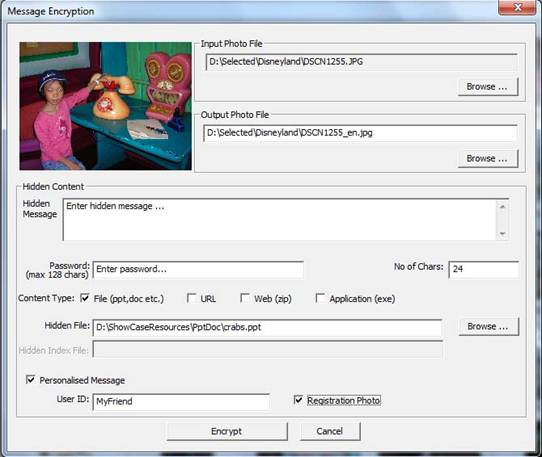
Figure 5.2: Photo Message and Content Encryption
5.3 Accessing Photo Messages and Photo Contents
There are two ways to access Photo Messages and Photo Contents in PhotoViz. The first method is to select the image in Display Area. The Photo Message, if available, is displayed on the dialog box located on the bottom of the left hand side of the user interface (see Figure 5.3).
Another way to access Photo Messages is
to click on the quick access icon ![]() . A
separate dialog box showing the photo as well as the Photo Message is displayed
as shown in Figure 5.3.
. A
separate dialog box showing the photo as well as the Photo Message is displayed
as shown in Figure 5.3.
Photo Contents are currently classified into three categories: Web contents, File Attachment and Windows Applications. PhotoViz automatically detects the type of Photo Contents and the appropriate button is displayed. Figure 5.4 shows an Adobe Flash contents being embedded into a photo. The web contents are launched upon the clicking of the “View Web Contents” button.
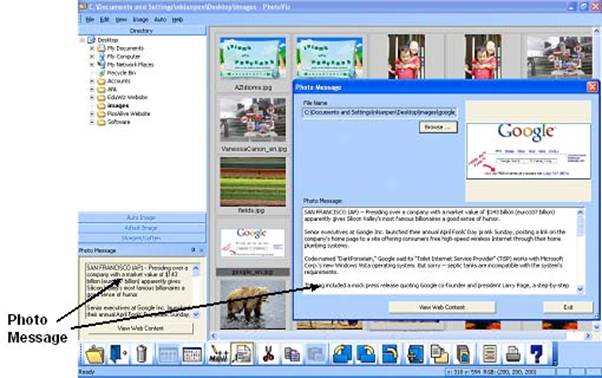
Figure 5.3: Access a Photo Message
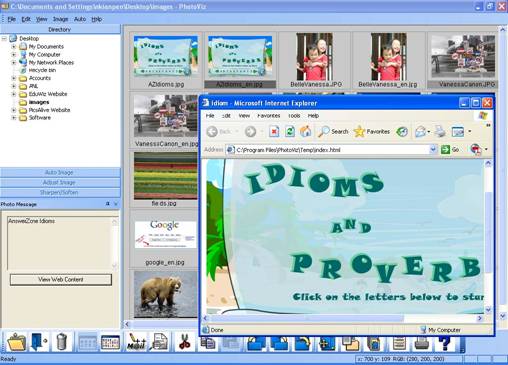
Figure 5.4: Accessing a Photo Web-Contents
If the contents are password protected, a dialog box to enter the password is displayed as shown in Figure 5.5. This is an added security feature to prevent unauthorized access to the contents encrypted in the images. The maximum length of the password is 128 characters.
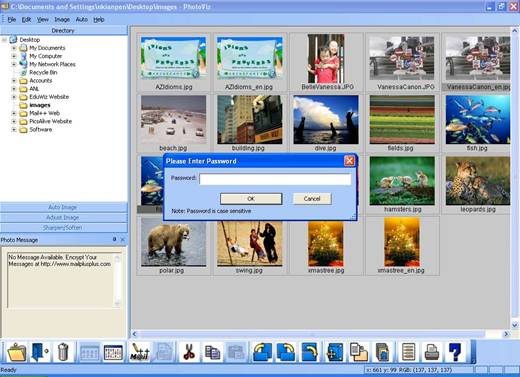
Figure 5.5: Password Protection
5.4 Accessing Embedded Media from iPhone
Images from the iPhone app - Active
Photo can be emailed or through direct transfer between the iPhone and computer
via a WiFi connection. To access embedded media and data, select the image in
PhotoViz and click on the quick access icon ![]() . A dialog box display the media embedded by the
iPhone is shown in Figure 5.6.
. A dialog box display the media embedded by the
iPhone is shown in Figure 5.6.

Figure 5.6: Embedded Content from iPhone
Figure 5.6 shows the message, audio recording, location data and the device parameters. There are two types of audio recordings: compressed (*.caf file format) and uncompressed (*.aif file format). By default, PhotoViz uses the Windows Media Player for uncompressed audio. To listen to compressed audio recordings, a QuickTime player is needed. When the “Location …” button is clicked, an Internet Explorer browser showing the location where is the image is taken will be launched. The location is displayed using Google Maps.
The phone’s parameters are shown when the “Device …” button is clicked (Figure 5.7). As seen in Figure 5.7, phone details such as name, identification number, model, system, system version are recorded. The time stamp as well as the location data are also shown. These parameters enable users to verify the authenticity of the image.
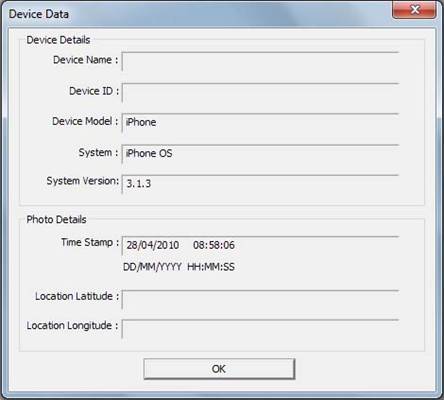
Figure 5.7: iPhone Parameters, Time Stamp and Location Data