3. Image Correction
Photographs cannot be perfect all the time and flaws with exposure, color and orientation are common. PhotoViz is a freeware for casual photographers and business users who want to improve their photos for prints, emails, presentations and sharing on the Web. PhotoViz is a fast and easy to use application for creating professional-looking photos. PhotoViz automatically fixes basic problems in a photograph. This saves a great deal of time and effort as there is no need to manually tweak your photographs.
PhotoViz also provides you with a set of semi-automated or manual tools to enhance your photographs. Intuitive tools that adjust overall color, contrast, brightness and sharpness of the photos can be used to ensure that your photos look their best. You may resize, rotate your photos and even view imaging information. These tools are designed for casual photographers and business users who want to improve their photos for prints, emails, presentations and sharing on the Web.
PhotoViz is a versatile tool for correcting common flaws in photographs. An overview of the Image Correction in PhotoViz is given in the table below:
|
Image Correction |
Image Adjustments |
Features |
Usage |
|
Auto Correction |
- Auto Color - Auto Contrast/ Auto Levels - Color Saturation - Sharpening |
- Single Auto (Auto Image) - Batch Auto - supports further image tuning in manual mode - automatically resize image and change file format - no knowledge required |
- correct flaws in many photos automatically - single click photo correction |
|
Semi- Auto Correction |
- Auto Color - Auto Contrast - Auto Levels - Auto Image - Special Filters e.g. Sepia |
- Select individual image adjustment algorithm - supports further image tuning in manual mode - a little knowledge on photo enhancement needed
|
- put special effects on photos - applied a specific image adjustment e.g. Auto Levels |
|
Manual Correction |
- Color Balance - Color Saturation - Brightness - Contrast - Sharpen & Soften |
- color correction for shadows, midtones and highlight regions - users have full control - some knowledge on photo enhancement needed |
- individually tune photos |
Table 3.1: Overview of Image Correction
PhotoViz lets users perform automatic
image correction for multiple images in a directory using the batch processing
function ![]() . Automatic, semi-automatic and manual image correction can only be
performed by ImageViz.
. Automatic, semi-automatic and manual image correction can only be
performed by ImageViz.
3.1 Automatic Image Correction
Auto Correction is an easy way to fix common flaws in photography. The computer analyses the photo and optimizes the photo for viewing and printing. Single Image Correction fixes one photo at a time while Batch Image Correction can automatically correct multiple photos.
3.1.1 Single Image Correction (Auto Image)
This function is available in ImageViz
only. Single Image Correction or Auto Image ![]() is a “one click” photo tuning
function. Auto Image enhances the image by tuning the following parameters:
is a “one click” photo tuning
function. Auto Image enhances the image by tuning the following parameters:
a. Color Correction
b. Auto Contrast or Auto Levels
c. Color Saturation
d. Sharpness
Figure 3.1 shows the image of a swimmer
before and after Auto Image. It can be seen that the colors, contrast and
sharpness is dramatically improved by the Auto Image algorithm. If there is a
need to change the default settings of Auto Image, for example increase the
blueness of the water, the user can make those changes in the Auto Options menu
![]() .
.
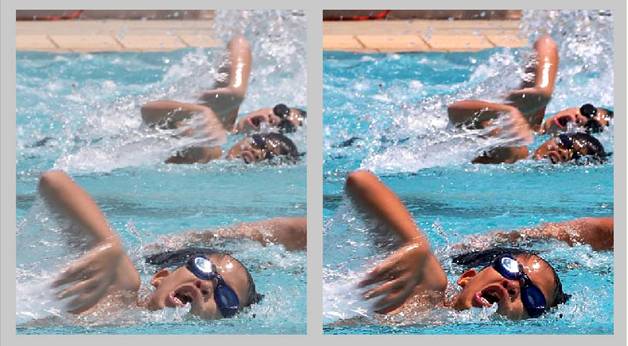
Figure 3.1: Original Image (Left) and After Auto Image (Right)
3.1.2 Batch Image Correction
This function is only available in PhotoViz. Multiple or Batch Image Correction is to automatically fix or enhance multiple photographs. This is a convenient and fast method to process many photographs and saves tremendous amount of time and effort. Note that PhotoViz does not overwrite the original file. Instead a new file with the extension “_viz” is created by default.
Batch Image Correction
a.
Click on the Batch Image Icon ![]() and Figure 3.2 appears
and Figure 3.2 appears
b. Click on the Source Folder button to select the directory where the original photographs are saved
c. The number of files in the Source Folder automatically appears.
d. Uncheck Include subdirectories if you do not wish to process subdirectories
e. Select the AutoImage options. Click on the Settings button to change the default color settings
f. Select the destination folder to save the new files
g. Select the file format, file size and the Zip file option
h. Change filename extension if needed
i. Click on the Process Image button
The user can also batch correct selected files only by clicking on the checkbox. Files are selected by holding the control key and using the mouse to select the images in the Thumbnail mode.
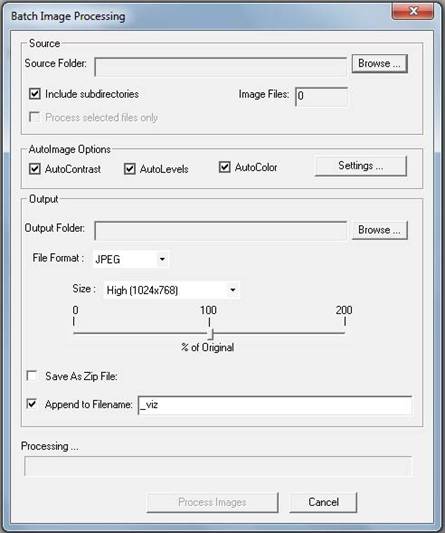
Figure 3.2: Batch Image Correction Menu
3.2 Semi-Automatic Image Correction
The automatic image correction consists of several sub-processes: Auto Color, Auto Contrast and Auto Levels. The semi-automatic image correction enables the user to select and individually apply these sub-processes to the image. In addition, special effects filters can also be applied to the image. Semi-Automatic Image Correction is available in ImageViz only.
3.2.1 Auto Color
Auto Color performs an automatic color correction on the image. Auto Color analyses the image and adjusts the color balance sliders to remove any color casts. The “white” regions in the image are identified and the color sliders are automatically adjusted so that these regions will appear as the white point. The white point is defined in the Advance Options menu with the default value of 33 for the red, green and blue colors (see Figure 3.4).
Figure 3.3 shows the image before (left) and image after (right) color correction using Auto Color. In this example, the red value in the Advance Options menu is set to 40, green to 33 and blue to 28. It is advisable to maintain the sum of the red, green and blue components to 100. Note also that further changes to the color of the photo can be made using the Manual Color Correction sliders.
Auto Color
a. In PhotoViz, double click on the selected image to launch ImageViz
b. In ImageViz, select Image->Auto Color from the menu at the top
e.
Save ![]() the image if
necessary
the image if
necessary
Figure 3.3: Original Image (Left) and Image after Auto Color (Right)
3.2.2 Auto Contrast
Contrast is simply as the difference between the lightest and darkest regions in an image. Contrast is important to an image because it enhances the visibility of the details and makes the image vibrant and lifelike. An image with a good contrast should have a wide range of brightness values properly distributed throughout the image. An example is the image of the monkeys shown in Figure 3.4. The image (on the right) after Auto Contrast looks better with more tonal difference between dark and light regions.
Auto Contrast clips all color channels identically and preserves overall color relationships while making the highlights appear lighter and the shadows appear darker. Note that Auto Contrast is a non-linear transformation compared to the contrast slider in the manual image correction which is a linear transformation.

Figure 3.4: Original Image (Left) and Image after Auto Contrast (Right)
3.2.3 Auto Levels
Auto Levels maximizes the tonal range of each color channel independently. The result is a more dramatic increase in contrast as compared with Auto Contrast. However, Auto Levels may introduce color casts because it alters each color channel separately. Figure 3.5 shows the effects of Auto Levels. It can be seen that there is an orange cast on the image due to the lighting. The color casts is removed by Auto Levels
Auto Levels
a. In PhotoViz, double click on the selected image to launch ImageViz
b. In ImageViz, select Image->Auto Levels from the menu at the top
e.
Save ![]() the image if
necessary
the image if
necessary
Figure 3.5: Original Image (Left) and Image before Auto Levels (Right)
3.2.4 Special Effects Filters
There are five preset special effects filters: Blue duotone, Green Duotone, Yellow Tritone, Sepia and Grayscale. Figure 3.6 to Figure 3.10 shows the effects of applying these five different filters. The original image is shown on the left and the results of the after the filters are on the right.
Special Effects Filters
a. In PhotoViz, double click on the selected image to launch ImageViz
b. In ImageViz, select Image and the desired filter from the menu at the top
e.
Save ![]() the image if
necessary
the image if
necessary
If further adjustments are needed after applying the filter, the user can tune the image using the manual mode. Manual Image Correction will be described in the next section.
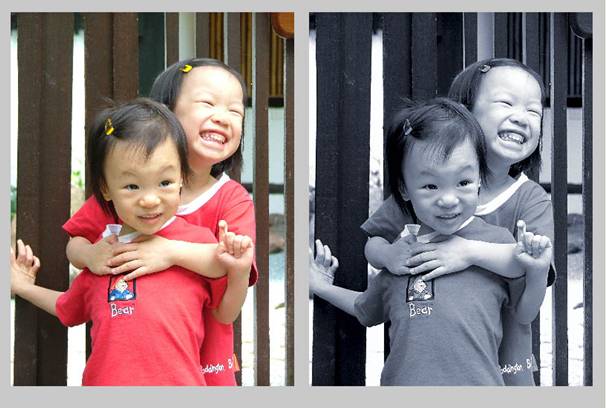
Figure 3.6: Original Image (Left) and Image after Blue Duotone Filter

Figure 3.7: Original Image (Left) and Image after Green Duotone Filter

Figure 3.8: Original Image (Left) and Image after Yellow Tritone Filter

Figure 3.9: Original Image (Left) and Image after Sepia Filter

Figure 3.10: Original Image (Left) and Image after Grayscale Filter
3.3 Manual Image Correction
Manual Image Correction enables advance users to manually enhance images. There are four main groups of manual adjustments: color balance, color saturation, brightness/contrast and sharpening/softening.
Manual Image Correction
a. In PhotoViz, double click on the selected image to launch ImageViz
b.
In ImageViz, select Image and Manual Image Adjustment ![]() icon
icon
c. The Manual Image Adjustment dialog box appears (Figure 3.11)
d. Adjust image using the sliders for color, brightness, contrast and saturation
e.
Save ![]() the image if
necessary
the image if
necessary
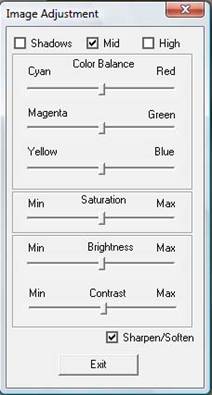
Figure 3.11: Manual Image Adjustment Menu
3.3.1 Color Balance
The color balance consists of three sets of sliders: Red/Cyan slider, Green/Magenta slider and Blue/Yellow slider. The range of the sliders is from 0 to 20 with the neutral point at 10. For example, in the Red/Cyan slider, 0 is for Cyan, 20 is for red and 10 represents the original image. In addition color adjustment can be applied to three distinct regions: Shadows, Midtones and Highlights. Shadows are the darkest part of the image containing significant visible detail. Midtones are the middle part of the tonal range of the image. Highlights are the brightest part of an image, especially the brightest part that still retains distinct detail.
Figure 3.12 to Figure 3.14 shows the effects of increasing the red component by the same amount in the shadows, midtones and highlights regions in the Merlion image. In Figure 3.12, it is seen that the red component is enhanced more in the darker regions of the image as compared to the lighter regions. Similarly, in Figure 3.13, the red component in the middle range of the image’s tonal values is enhanced more than the dark and light regions. In Figure 3.14, the red component in the lighter regions of the image is enhanced more than the shadows and midtones.
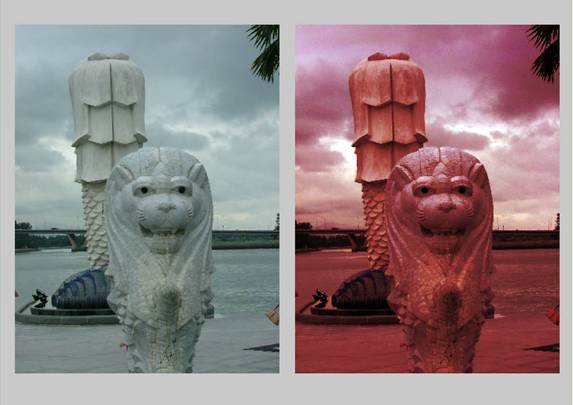
Figure 3.12: Increasing the Red Color Balance in Shadows
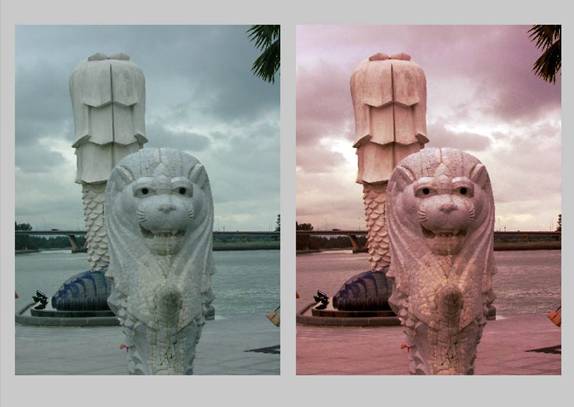
Figure 3.13: Increasing the Red Color Balance in MidTones

Figure 3.14: Increasing the Red Color Balance in Highlights
3.3.2 Color Saturation
Saturation sometimes called chroma is the strength or purity of a color. Saturation represents the colorfulness of an area, judged in proportion to its brightness. The saturation slider has a range of 0 to 20 with 10 being the neutral point. When the saturation is set to 0, the image becomes grayscale. The maximum saturation has the value of 20. Figure 3.15 shows an image with the saturation value of 18. Notice the strength of the colors especially the red T-shirt. In contrast, setting a saturation value of 4 desaturates the image as seen in Figure 3.16.
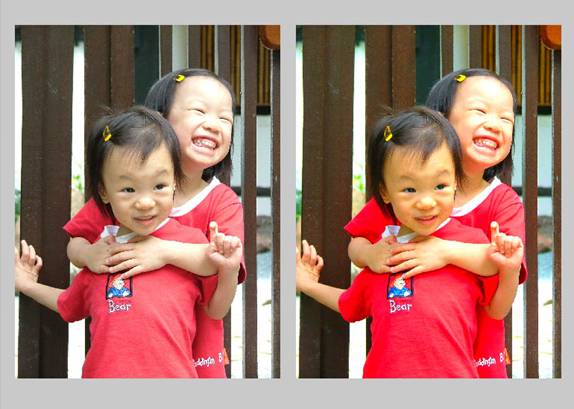
Figure 3.15: Increasing Saturation with saturation set to 18

Figure 3.16: Desaturating the image with saturation set to 4
3.3.3 Brightness and Contrast
It is important to note the distinction between brightness and contrast. Brightness makes the image lighter or darker overall, while contrast either emphasizes or de-emphasizes the difference between lighter and darker regions. Figure 3.17 shows an image of three elephants in a pond. Figure 3.18 to 3.21 shows the effects of various settings of brightness and contrast. The range of the brightness and contrast sliders are from 0 to 20 with 10 being the neutral point.
When the brightness is increase, the whole image becomes brighter (see Figure 3.18). Notice the difference when the contrast is increased in the same image (Figure 3.20). For example, the legs of the elephant become brighter in Figure 3.18 and darker in Figure 3.20. This is because contrast enhanced the difference between light and dark regions while brightness increased the overall lightness of the image.
When brightness is decreased, the whole image slowly becomes darker and eventually becomes completely black when brightness is zero. Figure 3.19 shows the image when the brightness is reduced to 3. Decreasing the contrast also darkens the image as seen in Figure 3.21. However, when contrast is zero, the image does not become completely black. Instead, it is becomes a grayscale image with a constant value.
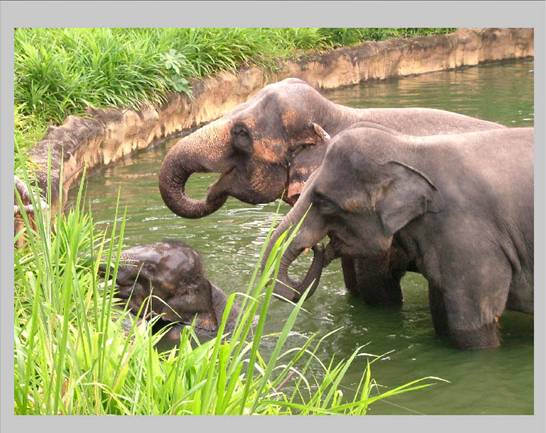
Figure 3.17: Original Image before Brightness and Contrast Adjustments

Figure 3.18: Image of Elephants with brightness value of 20

Figure 3.19: Image of Elephants with brightness value of 3
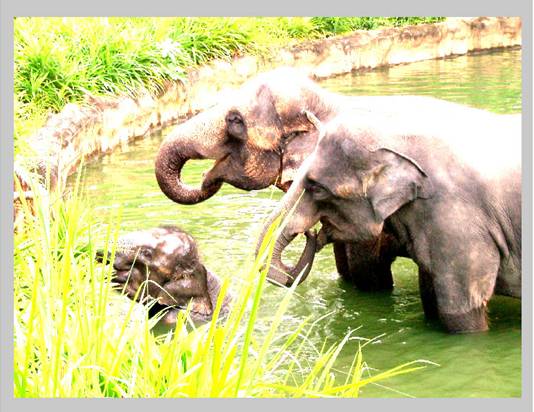
Figure 3.20: Image of Elephants with contrast value of 20
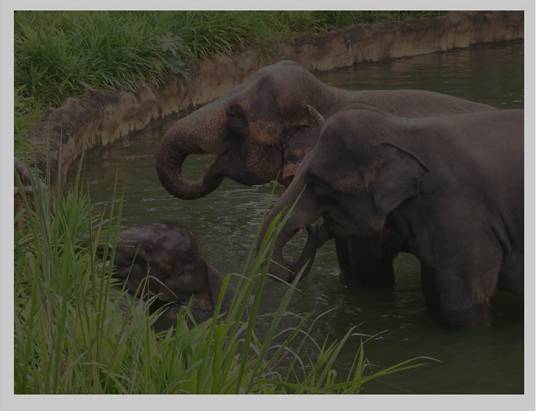
Figure 3.21: Image of Elephants with contrast value of 3
There is also an important distinction between Auto Contrast and the contrast parameter in this section. Auto Contrast is a non-linear transformation of all the three color channels in the image using histograms. Contrast on the other is a linear transformation on the color channels of the image.
3.3.4 Sharpening and Softening
All digital images, whether scanned or captured with a digital camera, share a common weakness: they’re slightly soft or out of focus. This is due to physical limitations in the way input and output devices capture and reproduce color. To compensate for this softness, images must be sharpened but with great care, because sharpening can add noise, edge distortion and color artifacts.
In Figure 3.22, the image on the left is the original image of a Merlion and the other image show the Merlion after Auto Image with softening. This is contrasted with Figure 3.23 which shows the Merlion after Auto Image and sharpening. The user can turn on/off the sharpening/softening process by checking on the checkbox below the contrast slider.
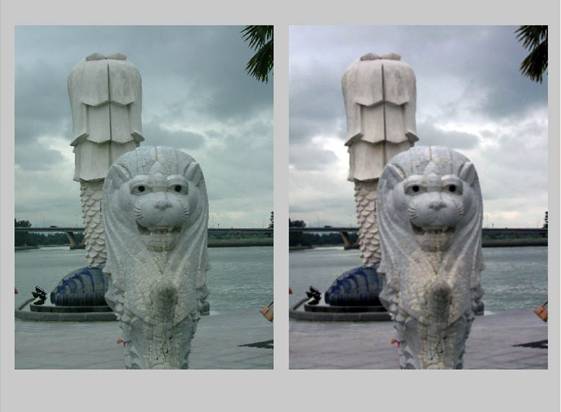
Figure 3.22: Original Image (Left) and Effects of Softening on the Merlion (Right)

Figure 3.23: Original Image (Left) and Effects of Sharpening on the Merlion (Right)
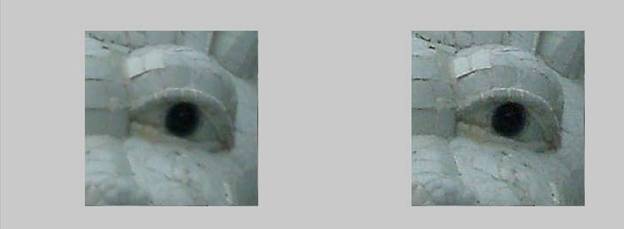
Figure 3.24: Original Image (Left) and Sharpening on the Merlion (Right)
Sharpening is extremely dependent on the image size. To perform manual sharpening, the image must be viewed at the original resolution. There is therefore a separate menu for sharpening or softening of the image.
Figure 3.24 shows the Merlion image in the Sharpen/Soften Menu. The square image on the left is the original image and the right image is the output. The user can navigate around the image by depressing the left mouse button and moving the mouse. The user can also zoom in or zoom out for ease in navigating the image.
Sharpen/Soften
a. In PhotoViz, double click on the selected image to launch ImageViz
b. In ImageViz, select Image->Sharpen and Soften Image from the top menu
c. The Sharpen/Soften dialog box appears (Figure 3.25)
d. Adjust image using the sliders
e.
Save ![]() the image if
necessary
the image if
necessary
There are two sliders in the Sharpen/Soften menu. The first slider has a range of 0 for softening and 20 for sharpening. The neutral point is 10. The second slider is the radius or mask-size and has a range of 1 to 5. The greater the radius, the more the image is sharpened or softened and vice versa.
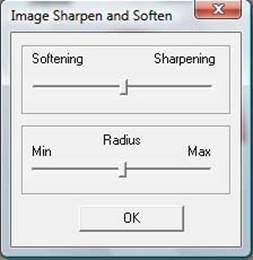
Figure 3.25: Sharpen/Soften Menu
3.4 Auto Options and Language Settings
This is only available in PhotoViz. Auto Options allows the user to specify or control the automatic image correction process. Both the Single and Batch image correction uses the parameters in Auto Options. There are two menus in Auto Options: Auto Image Options and Advance Options. The Auto Image Options menu (see Figure 3.26) specifies the tuning algorithms, output file size, JPEG file quality and the file format. Note that ImageViz also uses the settings in Auto Options.
PhotoViz supports three languages: English, Chinese and Thai. On startup, PhotoViz will automatically set the language according to the Windows language options. However, the user can overwrite the automatic language detection using the “Set as Default Language” checkbox.
Users can select the algorithms (i.e. AutoContrast, AutoLevels and AutoColor) using the checkboxes. By default, only the AutoContrast is selected. It must be noted that the Auto Level algorithm may sometimes result in color casts after correction. For Advance users, the parameters of the automatic tuning of images can be customized in the Advance Options Menu by clicking on the “Settings …” button.
PhotoViz can automatically format the file size and file format during batch image correction. This is a convenient automation tool when many images must be resized for presentation or web delivery. There are five settings for files sizes: low resolution, medium resolution, high resolution, original resolution and customized resolution. The low resolution file size is about 75K pixels (320x240 pixels), medium resolution is about 300K pixels (about 800x600 pixels), and high resolution is about 469K pixels (1024x768 pixels). Customized file sizes can also be specified using the slider which denotes the output file size as a percentage of the original size. The customized size range from 0% to 200% with the default value at 100%. This output file size to select depends on the final objective – for a computer presentation a High resolution is recommended and the Original resolution in used for archive or backup purposes.
PhotoViz supports four output file formats. These formats are bmp, jpeg, tiff and png. The default value is the original file format. It is recommended to use the JPEG file format for digital photos and the quality of the images can be customize by the JPEG Quality drop down list. A description of the various file formats is found in the Glossary in Appendix B.
In the Advance Options Menu (Figure 3.26), the user can specify a list of parameters in color balance, color saturation, auto contrast, auto sharpening and auto levels. The Advance Options Menu is activated by clicking on the “Settings …” button in Figure 3.25. For white balancing, there are three basic colors: red, green and blue. The user can increase or decrease the color components of the image. For example, if the image has a bluish cast due to the lighting, the user can manually increase the red and the green components to reduce the bluish cast. The default values of red, green and blue components are 33.

Figure 3.26: Auto Image Options Menu
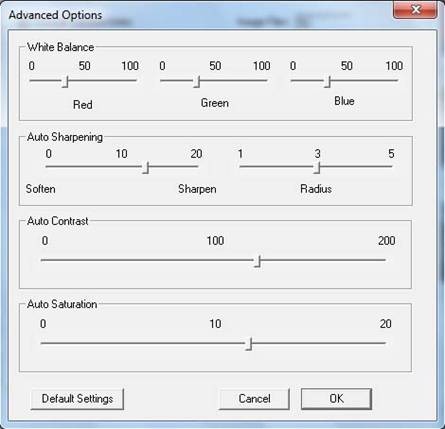
Figure 3.27: Advanced Options Menu
The contrast parameter is for the Auto Contrast algorithm. Increasing this parameter will increase the amount of contrast in the image and a contrast parameter of 0 will give minimum contrast. The default value of the contrast parameter is 125.
Saturation is the purity of the color or the amount of dilution with white. The saturation value in PhotoViz ranges from 0 to 20. A saturation value of 20 gives stronger color hues and a value of 0 results in a grayscale image. The default saturation value is 12.
The Auto Sharpening has two sliders. The first slider controls the sharpening or softening process. A value of 0 indicates softening while a value of 20 indicates sharpening. The neutral value (i.e. the original image) is 10. The second slider is the radius parameter and this parameter controls the amount of softening or sharpening. The range of the radius parameter is from minimum 1 to maximum 5. For example, maximum sharpening is obtained by setting the sharpening to 20 and the radius to 5. In the automatic image correction of PhotoViz, the default value for sharpening is 13 and for radius are 3.