2. Looking at the Work Area
2.1 PhotoViz
User Interface
The user
interface of PhotoViz consists of five areas: List Bar for directories or
menus, Display Area for image files, Quick Access icons, Photo Message and
Status Bar (see Figure 2.1).
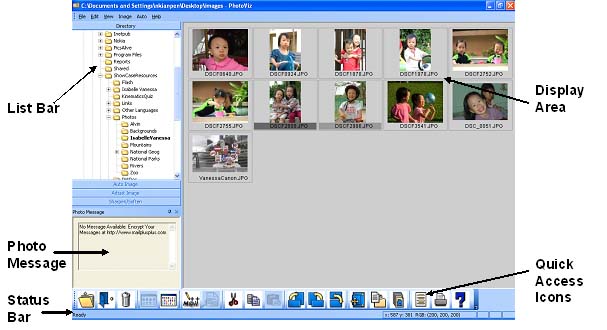
Figure 2.1: PhotoViz User
Interface
- List Bar (Menus).
There are four submenus: Directory List, Auto Image, Adjust Image and
Sharpen/Soften. The directory list
is a Windows Explorer-like interface to select the directory or folder for
viewing. The thumbnails of the
photographs in the selected folder will appear on the display area. User can expand a directory by double
clicking on the folder or by clicking the “+” sign in front of the
directory. Conversely, double
clicking an expanded directory will collapse it. Clicking on the “-” sign in front of the
expanded folder will also collapse the folder.
- Display Area. There are two display modes: Large and
Small Icons. Images in the selected
directory are represented as thumbnails for viewing and quick selection of
multiple images. The color of the
display area is always gray.
- Quick Access
Icons. These icons help the user to
access commonly used functions quickly. When the mouse is placed over the
icons, popup text bubbles will appear to help and guide users. See Appendix A for the list of functions
and their respective icons.
- Photo Message.
Secret or hidden text messages or contents (if available) are display in
this dialog box. The Photo Message dialog box lets users to quickly read
the hidden message, save attached documents, view web contents or execute
Windows applications.
- Status Bar. The status bar at the bottom of the user
interface displays information and instructions.
Multiple
images can be selected at the same time by pressing the control key and
clicking the images with the mouse. When
selected, the filename at the bottom of the image is highlighted. Multiple selected is useful for processing
selected images in a directory, e.g. rotation, deletion or auto batch
correction of selected images.
2.2 ImageViz
User Interface
When an image
is selected in PhotoViz, ImageViz will be launched (Figure 2.2). Like PhotoViz, the quick access icons are
located at the bottom of the screen.
ImageViz has several image specific icons like zoom, crop, next image,
previous image etc. Users can view their
images in the following ways:
- Original Image
- Image after Auto
Image (i.e. image after automatic correction)
- Original Image and
Auto Image (see Figure 2.2)
- Image after Manual
Adjustment (i.e. manual tuning of color, saturation, sharpness and special
effects like sepia, grayscale etc.)
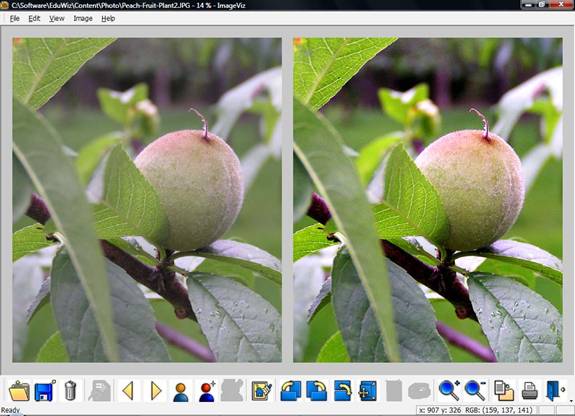
Figure
2.2:
ImageViz with Original Image (Left) and Auto Image (Right)
![]()
The current
display size as a percentage of the original size is shown at the top of the
ImageViz. Users can view the next or
previous image using the forward![]() and backward
and backward ![]() arrows. This
function is useful for previewing all the images in the directory. It is important to note that changes to the
image are not saved until the user saves the image using the Save As icon
arrows. This
function is useful for previewing all the images in the directory. It is important to note that changes to the
image are not saved until the user saves the image using the Save As icon ![]() . Therefore, all
changes will lost when the user switches to another image or returns to
PhotoViz.
. Therefore, all
changes will lost when the user switches to another image or returns to
PhotoViz.
2.3 Short
Cuts and Quick Access Icons
Quick Access
Icons provide an easy avenue for the user to access the commonly used
functions. A list of icons and their
respective functions is tabulated in Appendix A. These icons are designed to be visually self
explanatory. When the mouse is placed
over the quick access icons, text bubbles appear to help and guide the user.
The quick
access icons are automatically enabled when the functions they represent are
available to the user. Conversely, icons
are automatically disabled when the respective function is not available.
Functions can
also be quickly accessed by right-mouse click menus. Figure 2.3 to Figure 2.4 shows the different
types of menus: List Bar menu (Figure 2.3), Image menu (Figure 2.5). These short-cut menus not only provide quick
access to PhotoViz functions but they also allow users to manage image files
and directories. Users can easily cut,
copy, paste, create and rename files and directories.
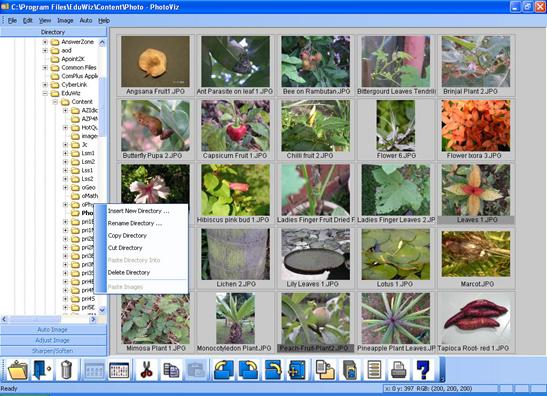
Figure
2.3:
Right mouse click quick access menu from List Bar
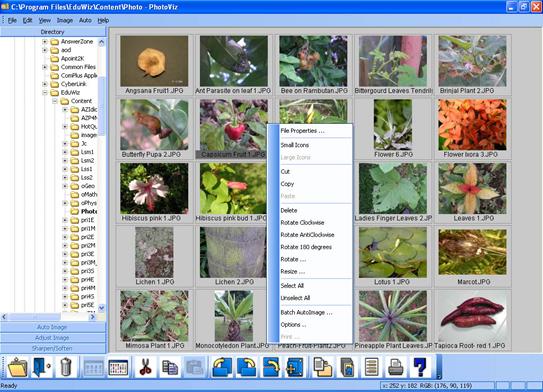
Figure
2.4:
Right mouse click quick access menu in the Display Area
2.4 Status Bar
The Status Bar
is located at the bottom of the user interface and comprises of two areas. On the left hand side is the instruction bar
where simple tips and help are given.
The right hand side shows the xy coordinates of the mouse cursor and the
RGB (Red, Green and Blue) values at the current mouse location. For example,
x:695
y:485 RGB: (147,198,31)
means that the
pixel at xy co-ordinate of (695,485) has a Red value of 147, Green value of 198
and a Blue value of 31. The maximum
value of Red, Green and Blue is 255. The
Status Bar is present in PhotoViz and ImageViz.